BOTTLEMATIC II
Operating Instructions
(shown with Rewinder Option)
For labeling cylindrical containers, front and back, from .5” to 6” Diameter.
CEBTMC-10 / -16 BottleMatic II Operation Manual
Page 2 CEBTMC-10 / -16 BottleMatic II Operation Manual
Label Info and Mounting
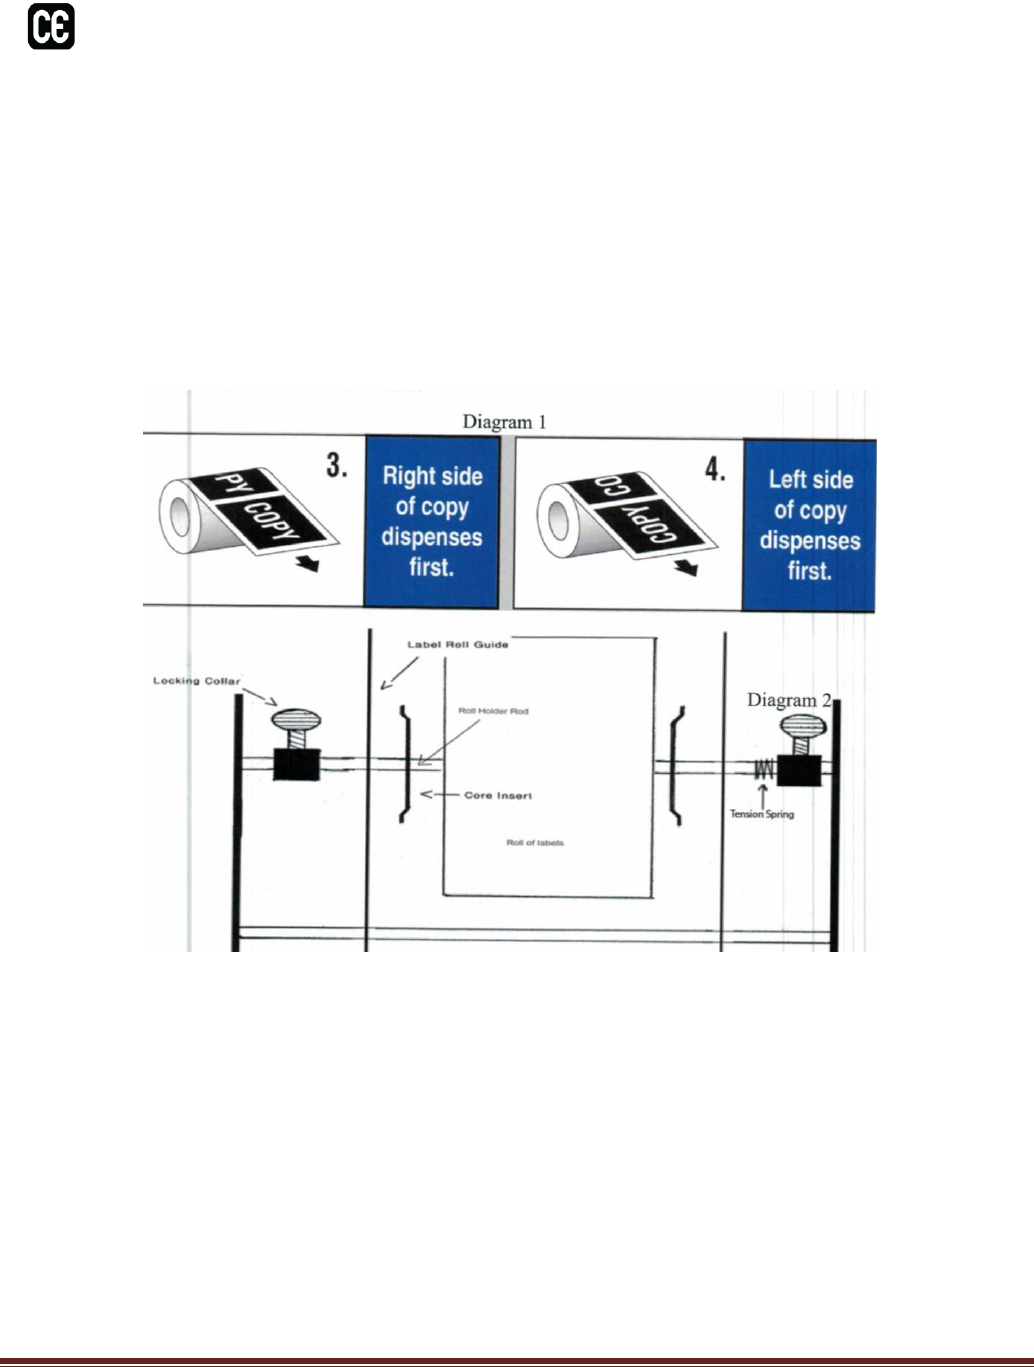
Labels should be wound on 3" cores with the core extending all the way to the edge of the roll. Any "label
out" copy position is acceptable. The copy position for printed labels is number 3 (recommended) or 4, see
diagram 1. This determines which way the label dispenses off of the roll and also which direction you will
put the bottle into the machine. Copy 3 allows the neck of a wine bottle to hang over the left side of the
machine as shown in the picture on page 1. Labels must be die-cut with approximately 1/8" gap. Narrow
labels will work but the backing paper for them must be at least 1-1/2" inch width.
There are two 1 " long, 1/16" aluminum roll guides and a tension spring included with the machine. These
guides should be placed on either side of the roll of labels between the metal core inserts and the locking
collar. The notches on the end of the guide slide onto the chrome rod at the bottom of the machine. Tension
spring goes between the right roll guide and the locking collar on the right side of the roll of labels as shown
in diagram 2.
CEBTMC-10 / -16 BottleMatic II Operation Manual
Page 3 CEBTMC-10 / -16 BottleMatic II Operation Manual
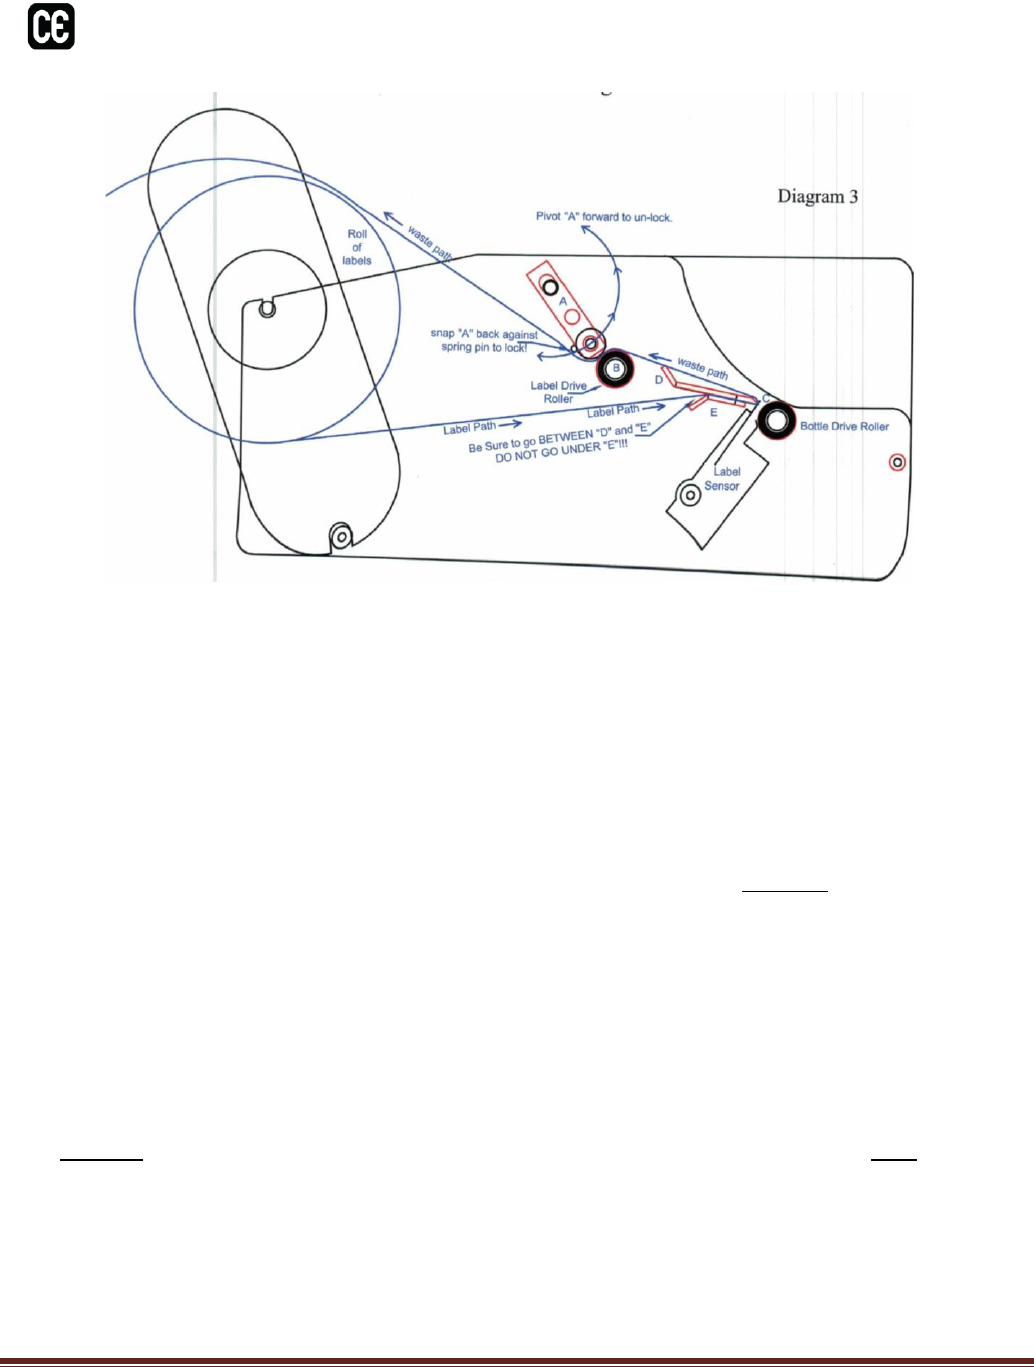
Threading the Labels Please refer to Diagram 3
1. Pull locking assembly "E" forward until it swings freely.
2. With labels facing down, unroll about 2 feet (600 mm.) of the labels and bring them under label drive
roller "B", which is located in the middle of the machine. Thread the labels between the top and bottom
dispensing tables "D" & "E" and then back towards the label roll. Make sure that the labels are over the label
sensor lever "C" located behind the front rubber roller. If needed loosen the thumbscrews on either side of
label roll and slide the roll to the proper position then re-tighten the thumbscrews
3. Thread the labels under the locking assembly "A" and over label drive roller "B".
4. Put slight tension on the labels by pulling them towards the back of the machine and STRAIGHT over
the roll of labels.
5. While keeping tension on the labels pivot the locking assembly "A" towards the back of the machine
until it "SNAPS" in place over label drive roller. You may need to push hard, but it will ''snap" when it is
locked.
6. Power on machine. Tap the foot-switch until a label dispenses every time you tap it. I! labels continue
to feed without stopping, or if a label only partially feeds past the label sensor then stops, a label sensor
adjustment is needed.

CEBTMC-10 / -16 BottleMatic II Operation Manual
Page 4 CEBTMC-10 / -16 BottleMatic II Operation Manual
Label Sensor Adjustment
ONLY IF STEP 6 FAILS! SENSOR ADJUSTMENT DOES NOT AFFECT PLACEMENT!
7. SIDE TO SIDE adjustment only: Simply loosen thumbscrew and slide sensor left/right to desired
position, tighten thumbscrew. GOTO STEP 8!
8. While thumbscrew IS tight, reach under front of machine and grasp label sensor housing. Pull sensor
housing towards the Feed Drive Roller until the small metal lever "C" is away from dispensing table "D" now
carefully and SLOWLY push housing towards dispensing table "D" until lever JUST makes contact with
dispensing table and then STOP! MAKE SURE NOT TO OVER ADJUST. If you continue to adjust the sensor
towards the dispensing table "D" after it makes contact, (causing the sensor to Pre-Load) the machine will
continue to feed labels without stopping.
Horizontal Adjustment
Adjusting horizontal placement of the labels on the object can be done 2 different ways:
1. You can simply adjust the bottle guide in the front to apply the label where you need.
2. You can slide the labels side to side, but this may require a sensor adjustment if the labels no longer
are contacting the label sensor, then refer to step 7.
BM-II Option Front to Back Spacing Adjustment
If you purchased a BM-II:
Flip (1 -label 2-label) toggle switch to down position for two label application.
1) Measure the circumference of the bottle.
2) Measure the total length of both labels (include the gap between labels on the roll)
3) Subtract the total label length from the circumference and divide by 2
Example: If your circumference is 9.42" and your labels total 5" then 9.42" — 5" 4.42" divided by 2 = 2.21
(set the display to 2.21) (You may have to make minor adjustments to achieve best results)
The display reads from left to right as follows: Inches, Tenths of an Inch, and Hundreds of an Inch (hundreds
of MMs, tens of a MMS, and MMs. Each position on the display has its own button below lt. The position
will read from 0-9 and then back to 0.
Optional Waste Winder
If your machine has the optional "Waste Re-Winder" after following previous steps, take the waste paper
back and over the take up spool, put your spring clip on (be sure not to push clip against frame)

CEBTMC-10 / -16 BottleMatic II Operation Manual
Page 5 CEBTMC-10 / -16 BottleMatic II Operation Manual
DISPENSA-MATIC Label Dispensers
3 Year Warranty
Your new machine has been carefully constructed of the finest materials, and
manufactured with precision machining. Every effort has been made to build a quality
product that will give you many years of enjoyable service.
All Dispensa-Matic Label Dispenser equipment is warranted for 3 Years after the
original retail purchase against defects in materials and workmanship. If a problem
arises, call or E-Mail us. We can diagnose most problems over the phone, but sometimes
a return is needed. Repairs or modifications resulting in damage will VOID the warranty.
Returned items must be ADEQUATELY packed and sent prepaid by the customer.
Shipping damage do to improper packing will VOID the warranty. INCLUDE A NOTE
stating the problem, date of purchase, company name, contact name, phone number and
address. We will make necessary repairs and ship it back to you at our expense via
standard ground shipping, if under warranty and within the U.S.A.
We do not warrant trouble due to: NEGLECT, ABUSE or improper treatment of the
equipment.
After the warranty period has expired, charges are made for repairs on a time and
materials basis, and return shipping charges will be added to our service bill.
